
Almost-Monthly Blogs ⟡ Join the Newsletter ⟡ Updating Japanese Lessons
Although Japan is widely known for its public transportation, many people still drive. In rural and suburban areas, cars are the primary means of transportation.
In my experience, this means that buses are few and far between, and the few train lines that exist in our area aren’t very convenient.
In a nutshell, it’s completely different from how I imagined life in Japan would be after living in Tokyo for a year.
Luckily, after living in Los Angeles for the better part of 3 years, I became accustomed to driving everywhere.
So if you’re curious about how to convert your foreign driver’s license in Japan, buckle in, check your mirrors, and hold on tight – this blog is a long one.
The International Driving Permit
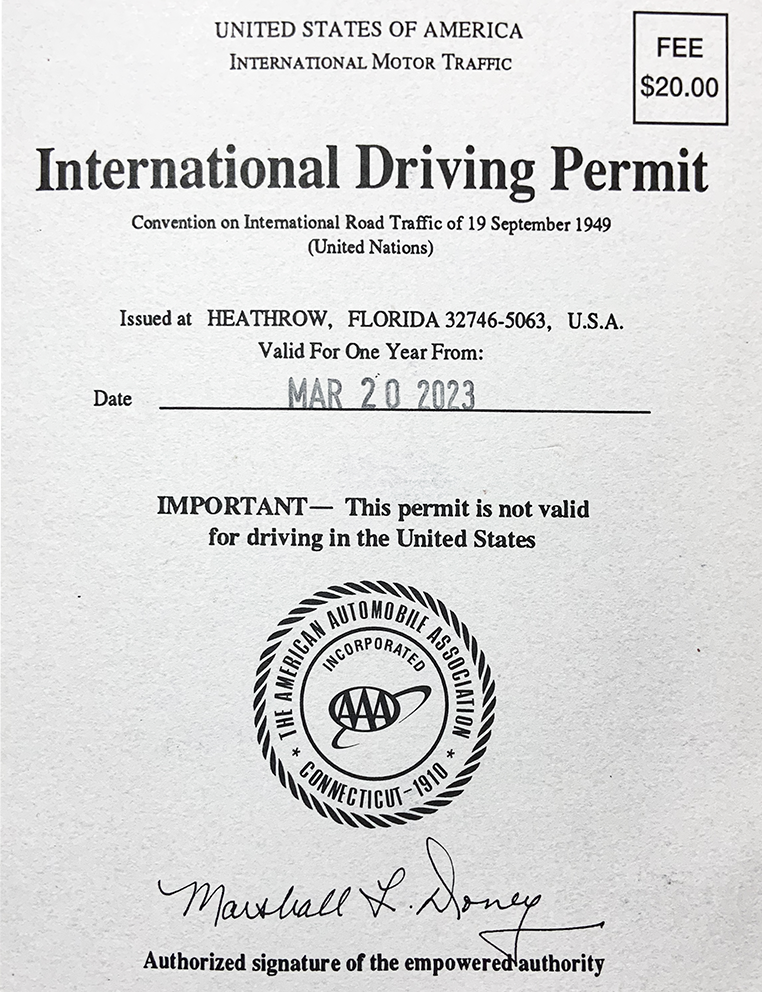
For the US and other countries in agreement, citizens with existing driver’s licenses can procure an International Driver’s Permit, or IDP.
This permit allows you to drive in another country for up to one year from its procurement. However, you cannot obtain a foreign license IDP within Japan. You must get it in the US before you arrive, or look into mailing options from AAA.
If you do have Triple A, getting an IDP is as easy as making the appointment and going in. They’ll take your photo and paste it inside. Then you just pay the fee, and you’re done.
Of course, while you can drive as long as the permit is valid, it’s imperative to convert your license in that time, especially if you plan to stay in the country for longer than its expiration.
Disclaimer: This is based on my personal and anecdotal experience. Take the driver’s exam at your own risk; information may differ by the time you take your test, and check your own prefecture’s site for more information.
Getting Started
In my husband’s and my case, we planned to remain in Japan for some time, and needed to convert our US driver’s licenses to Japanese ones.
The entire process from calling the driver’s license center to receiving my Japanese License took almost 6 months.
And that’s truly the minimum amount of time you need. Most people may need to take the driver’s test 2-3 times, extending their license conversion time by at least 2-3 months.
So for those just arriving in Japan and in need of conversion, here’s my advice: start as early as you can!
Also, keep in mind that my experience was in Tochigi prefecture; this process may vary, so remember to do research for your own prefecture.
1. Identify your prefecture’s driver’s license center
- Unlike in the US, where there are many Department of Motor Vehicles offices per state, there may only be one driver’s license center per prefecture.
2. Call to make an appointment for a document check
- Once you have looked at your prefecture’s website and guidance for a foreign license conversion (外面切り替え Gaimen Kirikae), call the center directly or have a friend/coordinator/translator help you
- This appointment can be around 2-3 months from the time you call, so give yourself plenty of time. For example, I called in July 2023, and the earliest I could make an appointment was October 2023
3. Prepare your documents
- Once a date is set for your document check appointment, be sure to gather all of the documents early. Check your prefecture’s website for the documents they require
- In particular, you are required to get a driver’s license translation from the official JAF website for about ¥4000. (You must do this from within Japan, or the website won’t allow you to apply for the translation)
- They’ll process this and send you a code to print at the convenience store– follow their instructions to print on the copy machine there.
- JAF stands for Japan Automobile Federation and is basically AAA in Japan
- ※Purchase your copy of the JAF “Rules of the Road” book at this time
- Prepare a generous amount of proof that you resided in your country for at least three months after receiving your most recent license. Make sure it covers more time than you necessarily need.
- I used pay stubs with the month, day, and year clearly notated. Rent/utility bills, etc., can also be used
- Include all old passports, residence cards, and driver’s licenses you’ve ever had *just in case*
- In particular, you are required to get a driver’s license translation from the official JAF website for about ¥4000. (You must do this from within Japan, or the website won’t allow you to apply for the translation)
4. Buy a copy of “Rules of the Road” on the JAF website
- You can do this when you get your license translated for about ¥1000. If you buy a digital version, it’ll be a PDF. But they’ll mail you a physical copy if you opt for it
- Read and review this a couple times over. The written test isn’t hard, but it’s derived from this handbook
5. Get a clear file at Daiso, and carefully put all your documents inside.
- This just keeps everything together and is much more professional than having all your documents swimming in a tote bag.
At the Document Check
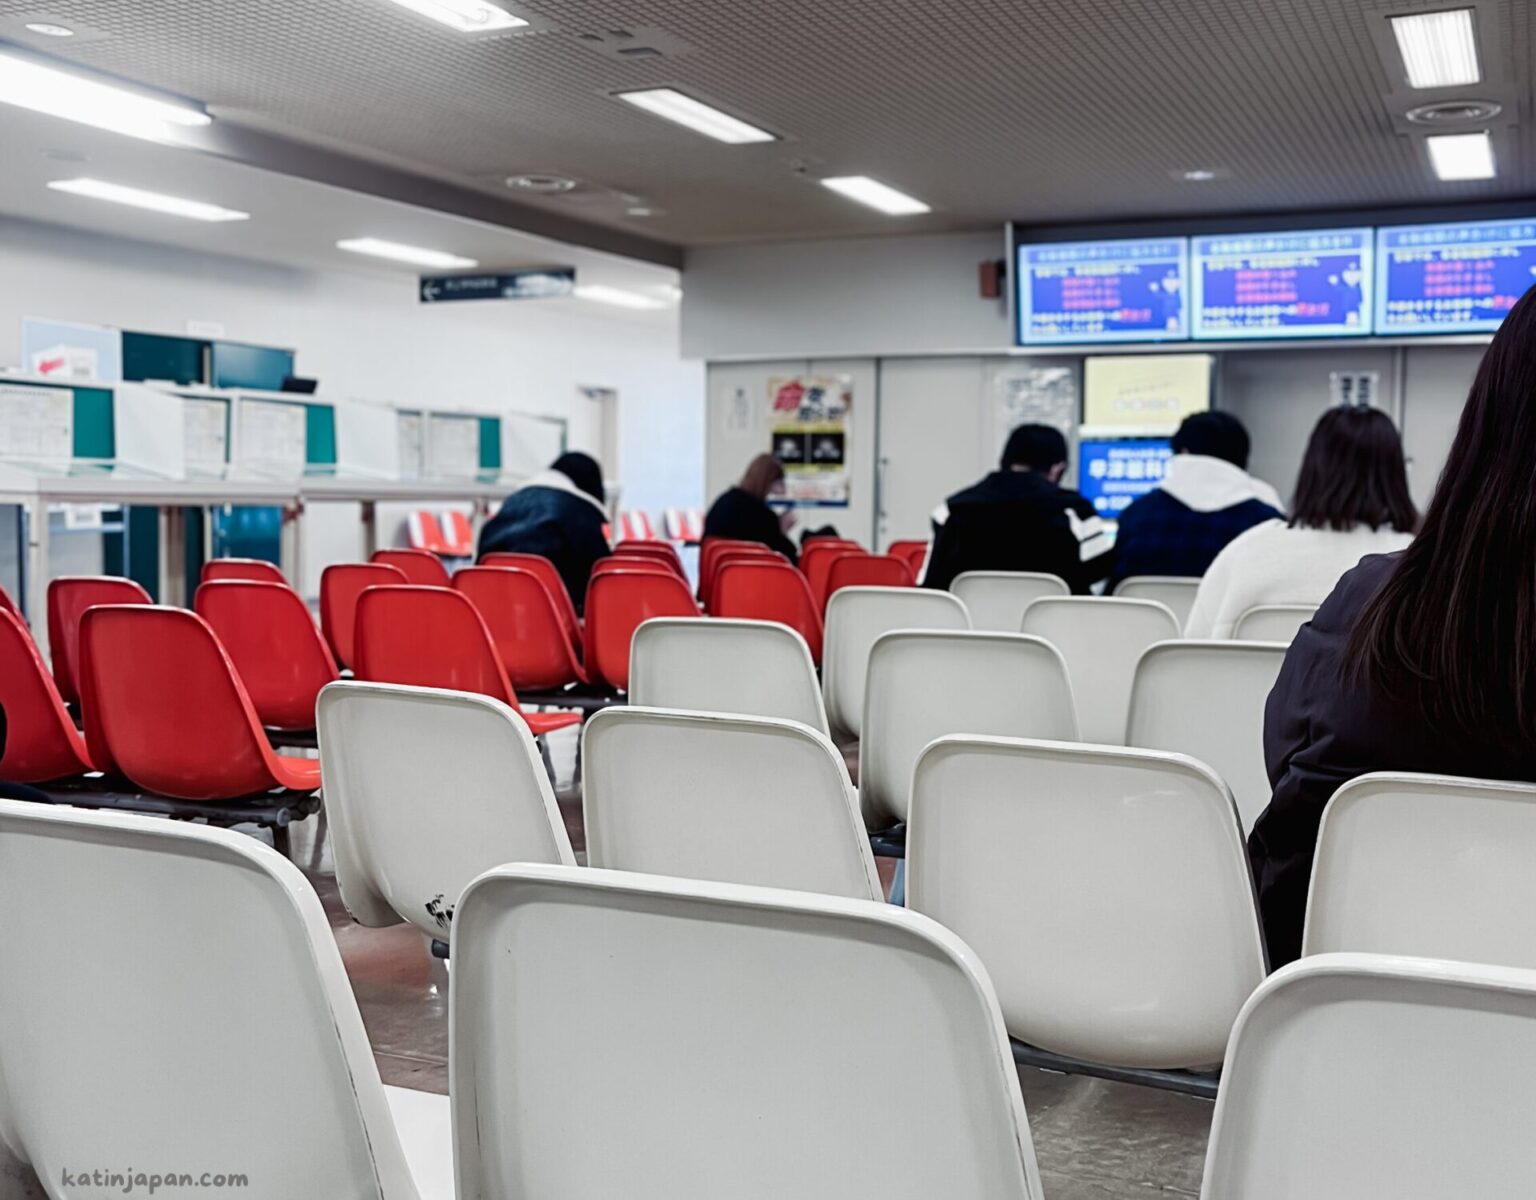
Though your experience may vary, when I arrived at the Kanuma Driver’s License Center for my documents check appointment, there were a few things I needed to do.
Although the check was conducted around 1:00 pm, I recommend you arrive earlier than needed, as your schedule allows. This is so you can fill in the proper paperwork and become familiar with your surroundings.
Since there are so many papers, people, and personnel around, it can be confusing and overwhelming at times, but just keep your cool.
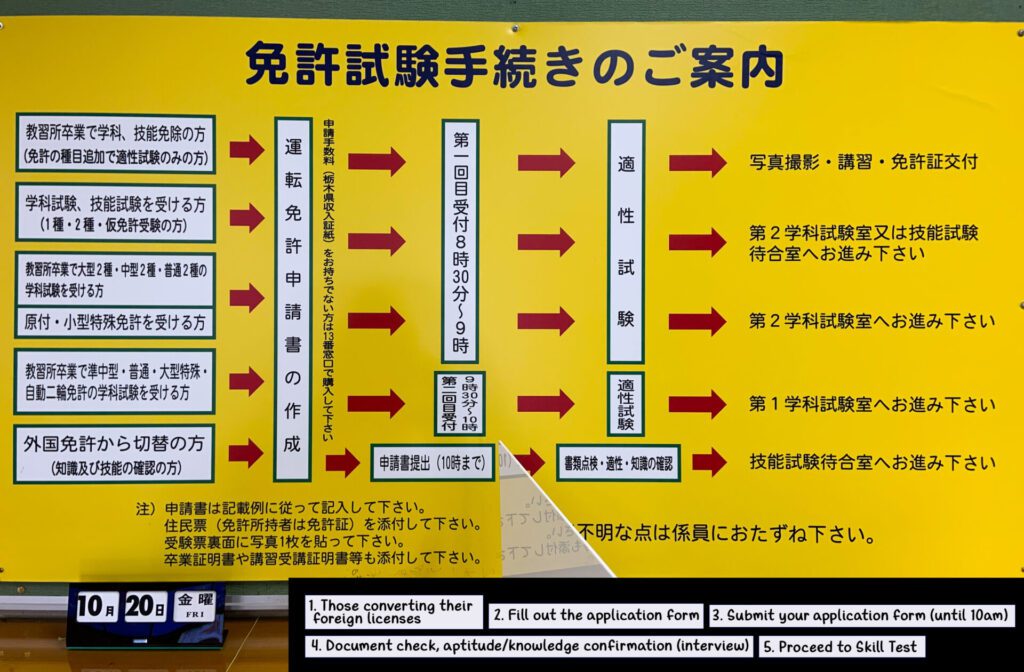
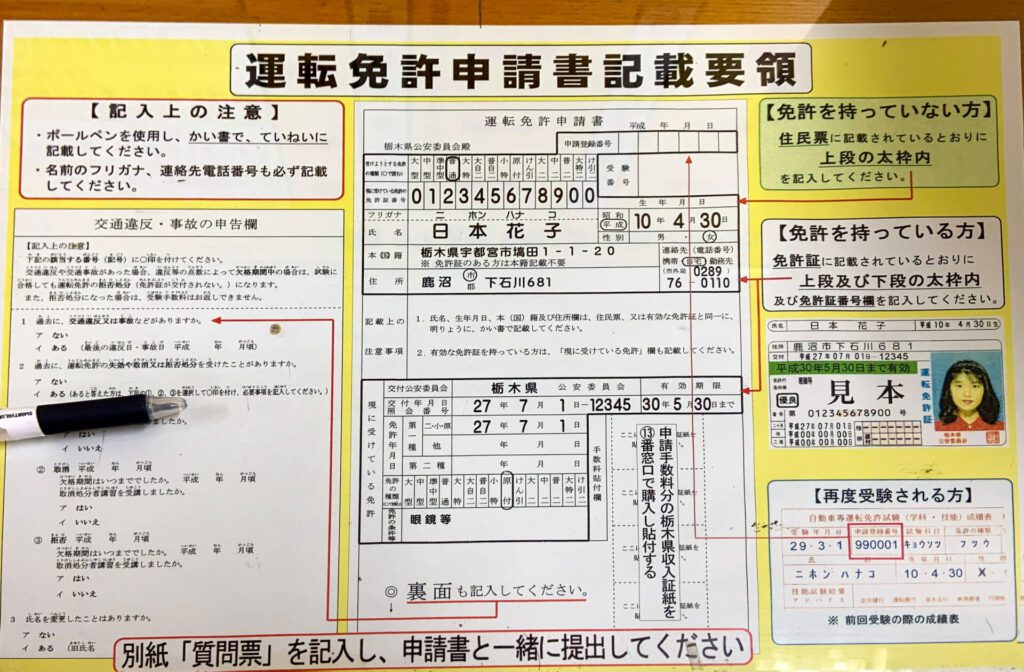
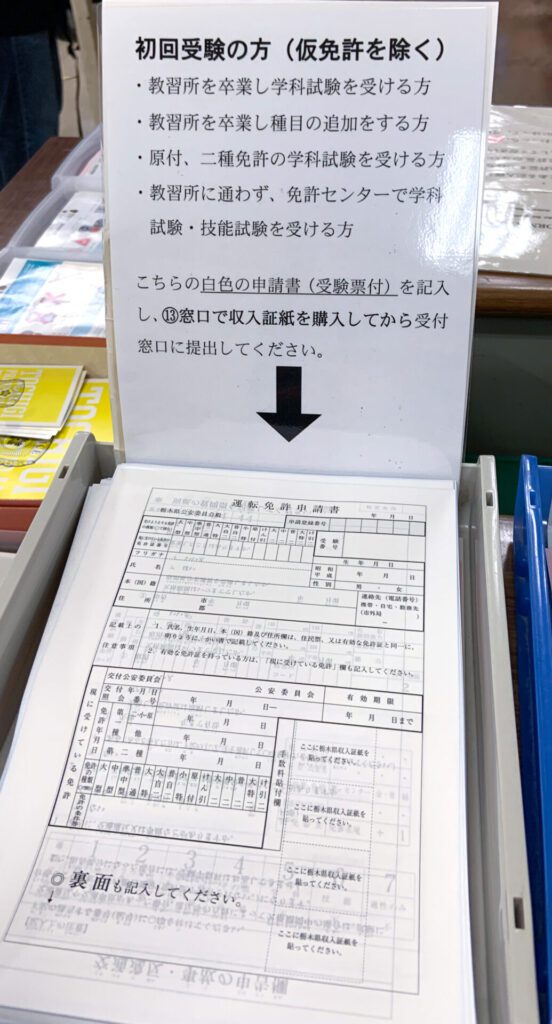
1. Fill out the Application Paperwork
- You can typically find this at a podium in the center. They also stock glue and scissors so you can stick your photo to the application
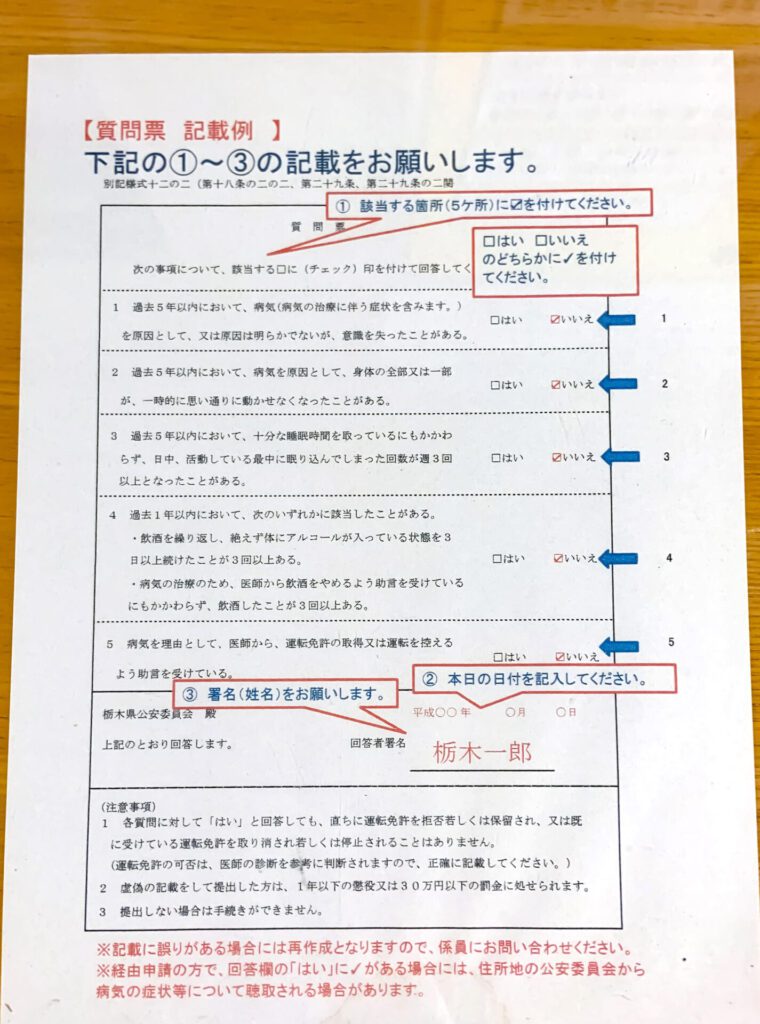
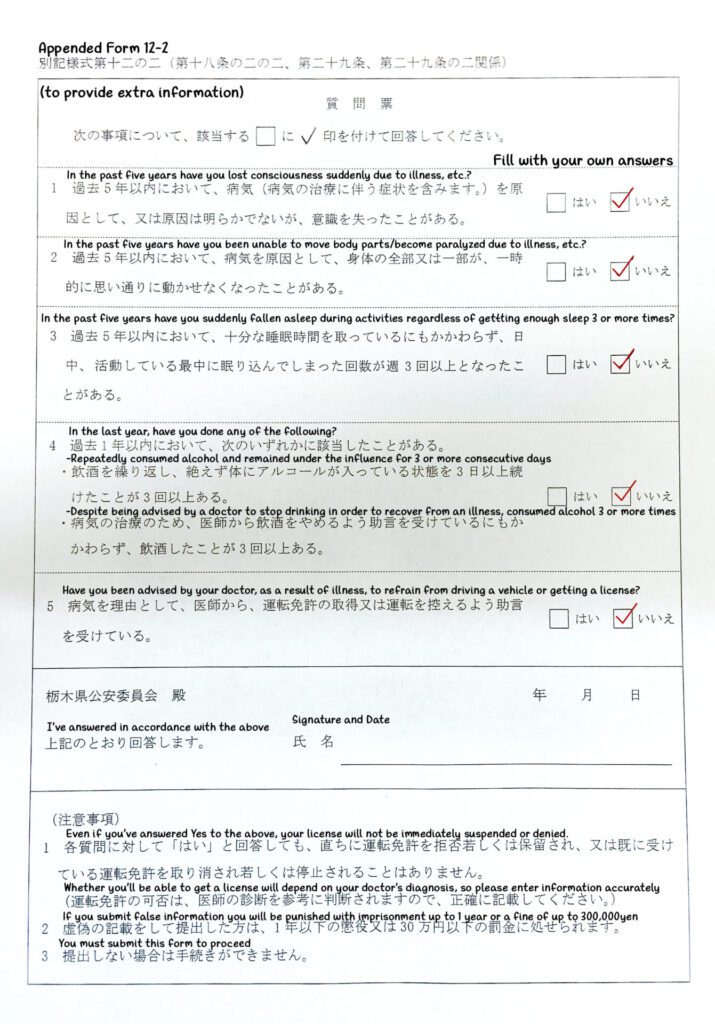
- You may need to fill in a required appended form as well, use google translate if needed
- I’ve included some images of Tochigi’s application and append form for example:
Click images to expand

2. Pay for and submit your application
- Pay at the payments window, where they will give you stamps to affix to your application
- This can cost around ¥4000, so come prepared with cash
- In Tochigi, cashless payments are now being accepted (since 10/2025).
- Put your application in the specified box at the correct window
3. Follow the workers’ instructions, ask questions if needed
- Ask where you need to be, what to do, or how to do it if needed
My Experience at The Document Check
Once I submitted my application, I just had to wait until I was called. In my case, they called several people up in a group.
Keep your ears out for either your name, country, and/or Gaimen Kirikae 外面切り替え (Foreign License Conversion). Then follow the clerk’s instructions.
When I went, they called each person separately to conduct a small interview and review the documents, particularly the proof of stay in their home country. You may be called in a couple of times; that is normal.
One note of caution: you will be required to explain the process of how you received your license, including how you were tested and practiced for your home country’s learner’s permit and driving test, and even how the permit and license were delivered to you.
Click images to expand
While I was able to go on my own, it was definitely a test of my abilities. If you aren’t confident in your Japanese ability to convey this information, I highly recommend you bring a Japanese friend, translator, or coordinator to help you.
Once your documents have been reviewed, they will photocopy your passport, residence card, and license, and attach them to your proof of stay and application.
This packet makes up your official application, which you’ll need for the practical driving test.
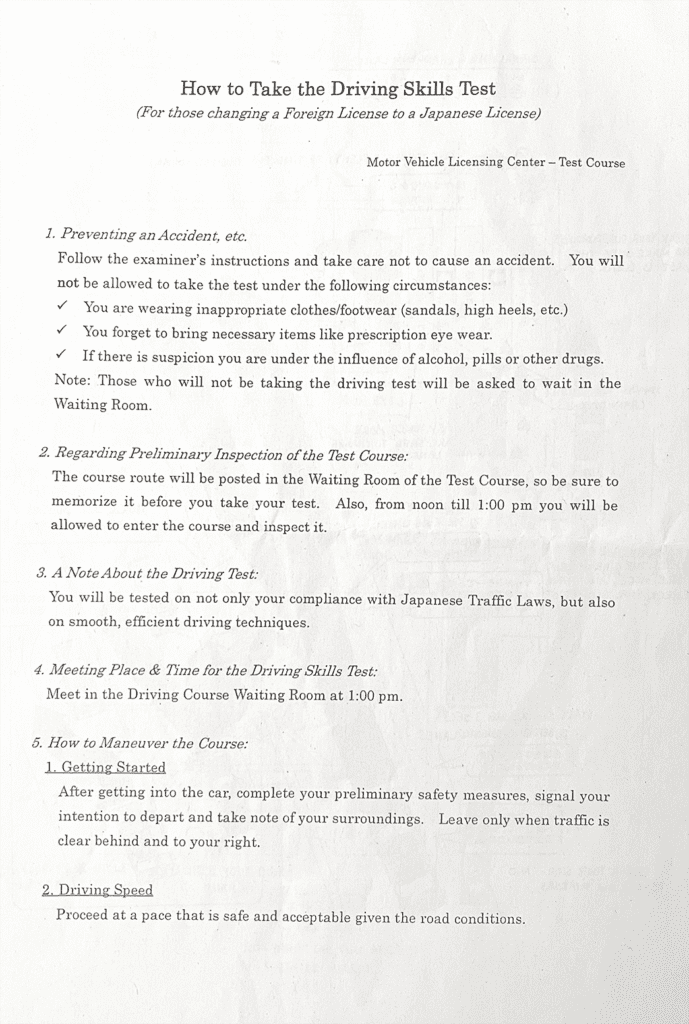
They will also give you paperwork that explains how the practical exam will work and all the timing.
You’ll be given a chance to make your practical driving test appointment once your documents are approved.
The time between can be 2-3 months in advance, so be conscientious when planning your appointments.
My test wasn’t until the end of January 2024, another 3 months of waiting time.
Practicing for the Practical Driving Exam
Watch videos, do your research, and get some time in the car to practice. The day before, practice for at least half an hour, ideally with someone who has passed the test.
Practice the S curve, crank curve, and holding onto the wheel with both hands like your life depends on it.
Practice observing the car from the outside for kids, cats, and check each tire before getting into the vehicle.
Practice how you will get in the car and adjust everything. Practice, practice, practice.
At The Practical Driving and Written Exam
The practical test appointment is a two-pronged exam consisting of a written test and a practical driving test on a predetermined course.
While the test isn’t necessarily difficult if you have driving experience, it can be quite challenging because the procedures are different from those in the US.
The exam for foreign license conversions used to be much easier than the Japanese one overall. As of 2025, however, the requirements and courses have been tightened and updated.
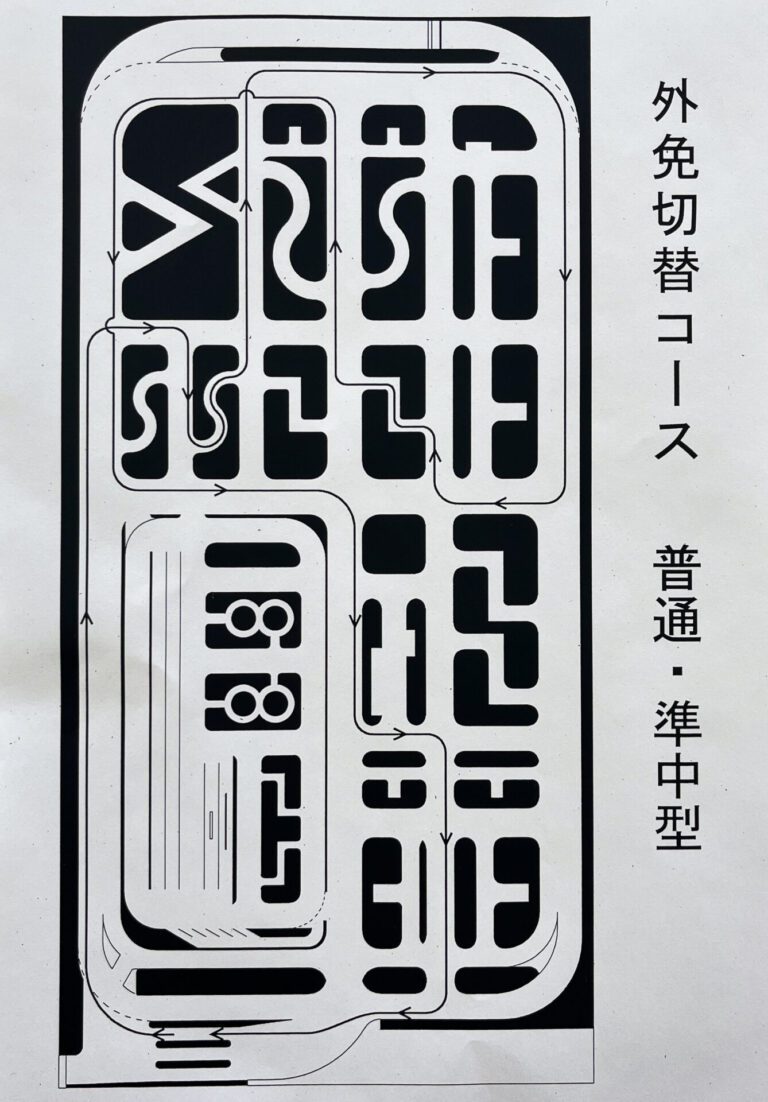
For example, in Tochigi, the course is now longer and includes extra steps, like driving up a hill and stopping for a train.
Also, depending on your prefecture, procedures will start at different times. Be sure to take this day off from work well in advance since the test takes up the whole day.
※You’ll need to bring some money and all your documents and licenses this time too.
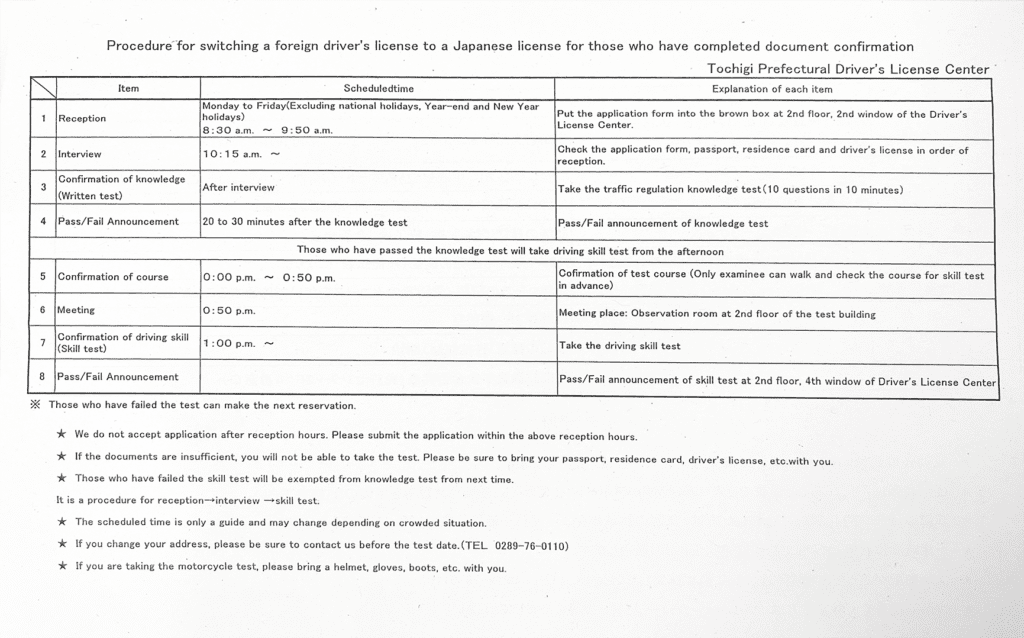
At the Kanuma Driver’s License Center, reception goes from 8:30 to 9:50 am, where you will submit your application packet to the designated window. However, I took the exam in 2023, so there have been changes.
Click images to expand
My Experience with the Written Driving Exam
From 10:30 am, they began calling in the foreign applicants to review their documents.
Since it was my first time taking the test, the proctors reviewed my documents, and I took the written test. They also conducted a brief eye exam. The test had 10 questions, and can be taken in English. As of 2025, the test is now 50 questions. Other languages may be available, but vary by prefecture.
Regardless, it follows the JAF booklet closely, so don’t worry too much about it. If you pass, you don’t have to take it again, even if you have to retake the practical exam.
Afterwards, they review the tests and announce the results at one of the windows. Once you pass, they give you a few more documents and a course map.
Review these thoroughly, and grab a bite to eat before heading to the course. The course is open to walk around from 12:00 to 12:50 pm, and the exam starts at 1:00 pm. You don’t need to walk the course for the whole 50 minutes, but don’t be late to the actual test.
My Experience with the Practical Driving Exam
Give yourself as much time as you need to walk the course, and bring a pencil or pen to mark your course sheet as you go.
Take note of the interesting parts of the course, and literally pretend you’re in a car.
At 1:00 pm, test procedures began. We waited in a room above the course before three police officers entered.
They called each person’s name and gave us each a number. This is the order you take the test in. I went second. s
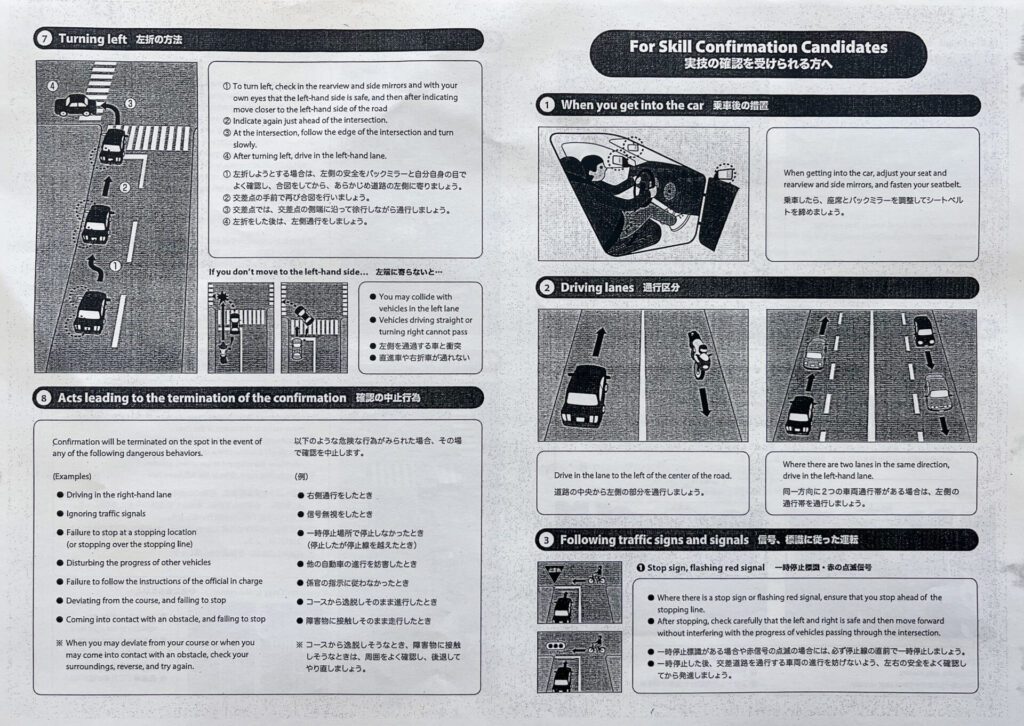
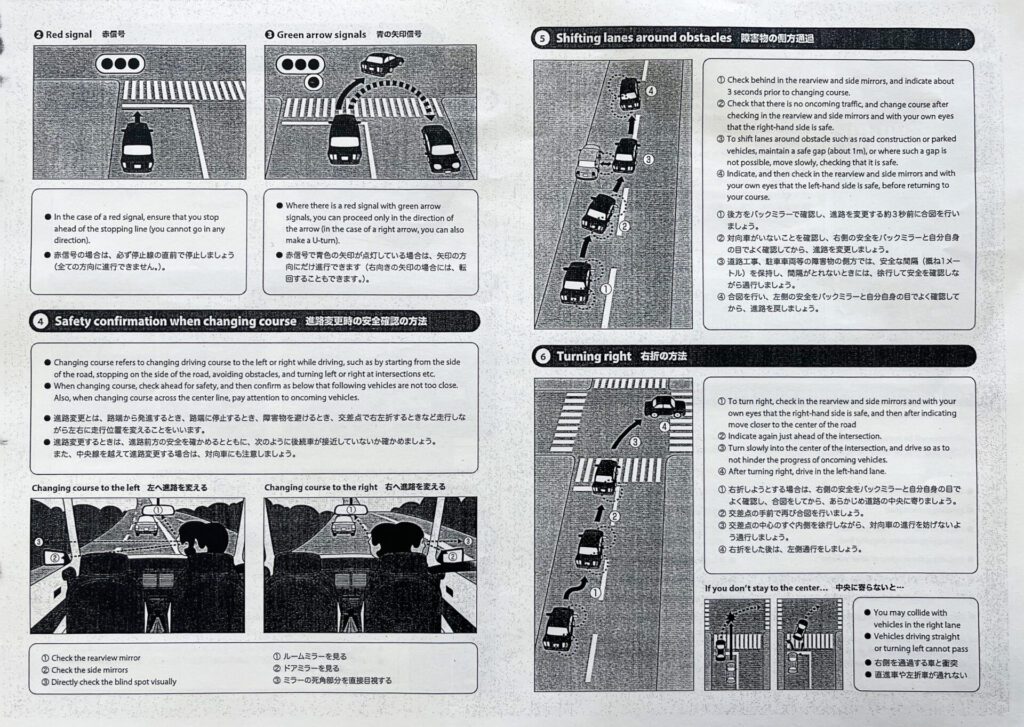
Before the test began, an officer literally gave us an explanation of the entire course. This included how to slowly get over to the left side before turning, and letting us know to signal as soon as you start the test.
It was a pretty thorough explanation, but if you need a translator, I highly recommend bringing someone.
You sit in the back of the car while the person preceding you drives. This gives you a chance to watch their actions and understand the flow of the test.
Take it slow, keep calm, and remember the practice you did while also taking into consideration the advice they gave to you in the waiting room.
Be sure to slowly activate the gas and brakes so as not to jolt the car too much, and keep your hands on the wheel as much as humanly possible. For our test, I was advised not to exceed 30kph.
At the end, we all exited the car. Then the person taking the test re-entered the back seat and received feedback. In Tochigi, you must have a 70/100 score to pass, and it’s renowned for being one of the strictest driving tests in Japan.
After waiting for about an hour, we finally received our results. Thankfully, I passed (on my first try, too!). However, the remaining participants unfortunately didn’t. I’m telling you– this one’s the strictest in the country.
When you pass, you are directed to pay another fee: ¥2500 for the license. Then they take your picture and process your data. I also created a PIN that can be used to retrieve the license data if I ever need it for another class of license, like truck, bus, motorcycle, etc.
You also get another set of papers, and you need to buy Beginner Driver’s Marks for your car. You can get them at Daiso as stickers or magnets. These have to be on your car for a whole year.
If you don’t pass, you receive your application and a data document to be submitted next time, and you also get to make your next appointment.
However, your next test date has to be one month from your current appointment.
Thoughts
When I was looking for information on the foreign driver’s license conversion, I had to go through numerous Reddit threads, YouTube videos, and older web resources.
So I wanted to summarize my experience and some of their key points in one place.
But, for how helpful some of those resources were, one thing I can’t stress enough is physical practice in a car in Japan.
I’ve had an American license for almost 10 years (eesh). And I’d been driving often for the better part of 6 years- in Los Angeles, no less.
So if you have lots of practice and you know your car’s turn radius, size, and how to use your mirrors effectively, you should be fine on the technical aspects of the test.
However, the driving test here is like a recital– there are specific motions and acts that you have to follow through on. Not to mention, you should address the testers with courtesy and good manners.
Finding a friend who can help you practice before the exam is paramount, since driving schools cost so much, and finding classes for foreign license conversions is difficult for non-natives.
That said, if you can find a class/instructor in your area, absolutely go for it.
You’ve got this! And if you want to know more about getting an ETC after you pass your test, look no further than my Guide to ETC Cards in Japan!